Saturday, December 29, 2012

Superia film!

Today I went to the Toronto Lomography store.. A nifty little story, with hundreds of brand new lo-fi cameras.. From Holga's to LC-A's to Diana's. 
110, 120, 135... All the roll films under one roof!  Awesome stuff!

But then I found this...
My little prizes!
Fujifilm Superia 100 in 120 roll film!  Oh man!  I mean, it's great at 200 and 400 in 35mm, but in 120?!  Holy cow!  I am just floored at this.  I can't wait to start shooting it.. 

First roll of film in my Bronica and Rollei when I unpack at the new house...

Definitely going to be Superia 100! :)

Going to see how this stuff handles in the summer months too!

Until next time.. check out the local LOMOGRAPHY store near you, they might have some really interesting things that you may enjoy.  I know I wasn't expecting to find some Fuji Superia 100, but I did! 
and Remember, keep those shutters firing!

Saturday, December 22, 2012

Trees, Faces, and a Face Plant!

After getting my new phone, and realizing that there's a little bit of a stigma involved when shooting Cell Phone Photography, you have to find things that are a little out of the ordinary, and try to shoot a fair amount of close-ups to get a muddied shallow Depth of Field.
Even then, the tiny sensor still does a pretty good job with sharpness, low-noise, and some nice colour rendering.
Seeing this face on a tree, I just couldn't help myself, wandered over, and took a photo or three of a tree with a face.  But not just any face...


Face Plant
"Face Plant" - Samsung Galaxy S2 LTE

Tuesday, December 11, 2012

Android Photography

Android Photography...

I know, that just sounds weird.  Like something out of a cheap Sci-Fi flick, where you have an artificial life-form taking photos.
Having just been (recently) given a Samsung Galaxy Nexus S2LTE Mobile, I decided to try to muck around a bit with the camera on it.  It does what I expected it to do, and that's take decent images that are highly saturated, and fairly sharp.  DSLR or P&S quality?  Not really, but overall decent.
One thing is, though, that I downloaded an APP called "Retro Camera" for some fun effects.  One that I have really grown attached to is the Xoloroid 2000 which adds a "Polaroid" type of feel to the photo, with low saturated colour, and muted sharpness.
The scratches, though, are an unfortunate side-effect of this "camera" choice, but that's okay, it is a funny effect.

Funny when you go to view the photos in the APP as it takes you to a big door that says, "Print Developing In Progress" with a big flashing red light and a sign that says, "DARKROOM IN USE".

Then when it is all "done" with the developing, they are hanging, complete with clothes pegs, on a line to "dry" and view.
Pretty funny, actually, considering.

The effect I am talking about is here..
In An Old Style Dungeon

Do you like this nifty look?  Check out the APP Retro Camera in your Android Playstore, or on your iPhone from iTunes.

If you want to have a more authentic look, then pop over to the Film Photography Project for some Impossible film and a Polaroid camera.

Until next time, keep those shutters, or in this case phones, firing!


Saturday, October 13, 2012

Scott Kelby World-Wide Photowalk

On October 13th, 2012, it marked the Scott Kelby Worldwide Photowalk.  I took part this year, along with my wife, and photographer friend, John Meadows.

We were in the Mount Pleasant Cemetery in Toronto, Ontario, where we wandered about with our non-digital cameras (pretty much the only walkers without a digital camera) and were quickly shunned by the Digital shooting counterparts.

I enjoyed the day with my K1000, Exakta Varex, Signet 35, and Rolleicord V.  I used Chrome (Reversal) B&W and C-41 films for the walk, and am very happy with the results so far.

Although I was really looking forward to the chance at using my 4x5 view camera, I never brought it along as I should have.

I truly did enjoy the walk, until it ended with my car getting towed and having to track it down to the impound yard. Grr...

That still didn't deter me from really liking the photos from the walk, especially the shot of a gorgeous Weeping Willow tree.  What a beautiful tree it is.  The way the branches cascade down reminds me of a graceful waterfall.


Willow Falls
"Willow Falls" -  Pentax K-1000 35mm SLR
SMC 50mm ƒ/2 - Ilford FP4+ 125 (exp. 1999)
HC-110 Dil. M

Saturday, October 6, 2012

Pick a Card

Digital photography to me is not something I am fond of.  It has nothing to do with the fact that it is digital either.  To be honest, I love the look.  Clean, clear, crisp, sharp, vibrant and detailed.

Nor is it that the equipment is horribly expensive, because compared to cameras of yesteryear, it isn't.  A brand new camera in 1995, such as a Canon EOS ELAN II would be roughly around $1500.00 today for the body alone.  That is right in line for purchasing a new Canon EOS 7D.

My biggest quip about Digital Photography actually is more to do with the ever-changing world of the dSLR.  As if more MP and newer is better.  Or going from a P&S camera to a dSLR will suddenly make your images, not just better, but make you a better photographer.
Personally, I believe that starting out with film, using a manual mechanical SLR or Rangefinder will do far more to make you a better photographer than Digital ever will. 
Sure, it's nice to have all the AUTO features that are available today, like switching your camera to "AUTO" mode, or "PORTRAIT" mode for portraits.  But then it takes the thought out of the camera side, and just leaves you having a glorified Point & Shoot camera that has a changeable lens.

For me, it's about making the image from the start to finish and having full control. 

But I digress from the main point. 
Digital photography allows you to explore a different venture.  For those looking for instant feedback to see the image how you were hoping without taking the time to develop the film, it is definitely a blessing.  But I feel you lose a bit of the magic along the way.

Pick A Card - Pre-Hallow's Eve ShootSo instead of relying on the magic of film and develping, you have to work with the magic of vision.

So for today, I give you a vision of beauty, of elegance, and of soft light.

Wearing a "Playing Card" costume, where Hearts is the main suit, naturally, the selection is slim.

Pick a card, and see how fortune favours you.

Sunday, September 30, 2012

Nothing To Hide

Halloween is coming, and in only another 4 weeks it'll be upon us.  Autumn has arrived, and the harvests are in, so now is time for the ghosts and goblins to come out.
Well, along with those ghosts and goblins is also the other characters.  One, such as the "Queen Of Hearts" from Tim Burton's Alice In Wonderland (2010).
A costume ready for Halloween 2012, and a knock out indeed!
Again, my Digital Cameras have gotten yet another workout.  They are definitely useful for some things.  Instant results?  Not really, as there's still work to be done after the shot.

But they are definitely very clean, sharp, and wonderful!


Pre-Hallow's Eve Shoot

Saturday, September 22, 2012

Last Christmas....

An older photo, and one I never took. 
Last Christmas, as a fun little photoshoot, I decided to pick up a Santa Claus outfit, and have a "visit" with my two boys. 
Nikolas was so excited that Santa came and visited him that I swear he was going to pee his pants!  Noah, well, he did what most little children do around the bearded fat man.  He screamed and cried!  Oh it was a sight to behold, and funny as heck, but I still managed to get a photo of him as happy as can be.
Although it was shot on a Dreaded Digital camera (not really dreaded at all) it did make for an excellent choice of camera, since kids are fickle, and I might very well have missed a great photo like this.
 
Next time I have to make sure that Donna knows how to use a proper film camera for these photos.  And hopefully Noah will be in much better and happier spirits to see the Jolly Ol' Fat man!
 
Cheers to Christmas!

Saturday, September 15, 2012

Caffenol-C 2 Stage Developer

An idea that I have been hashing in my head for a while now, quite a while actually, but never brought to the forfront until recently, after bringing the idea up in the Caffenol & Alchemy group on Flickr, I decided that it was time to actually  bring the idea to light.

Sure enough, last night (Sept. 14 2012) I did.  The results were, in the beginning, less than stellar.  Okay that's being kind.. They were crap!  Horrible results that would make the most seasoned alchemist dismayed and upset.  But I would say that it was a resounding success, as it proved that it was possible to create a 2-stage developer with Caffenol-C.  Of course, first test just gave me poor grain, bad fog, and a messy result.
Duaflex IV

So I decided, okay, time to bring up the concentration of Bath (A) to compensate.  So I added another 20g/L of Vit. C to the mix.  Bringing the total to 40g/L of Vit. C to the mix, while keeping the 1/2 cup of coffee (200g/L) the same.
This, coupled with pushing the film from 400 to 1600ASA I actually started to see a bit better of a result.  In fact, the result was rather impressive, considering that it was also pushed to 1600ASA instead of at 400..
Fruits & Iced Tea

The result at 1600ASA was quite surprising, as I got decent highlights, but extremely inky black shadows.  In fact, it was just extremely dark shadows, and the grain is rather pronounced.
But still, a usable and impressive result.
But I was still unimpressed, as this was about the only usable result from the entire set as the rest were underexposed (maybe my fault?)

So I decided to up the ante..  I increased the dilution of Vit. C two fold, from 40g/L to 80g/L and increased the coffee to about 2/3 cup (300g/L).
This caused it to become very inky brown, but the results of the final test of the evening gave me some insight on how to make it better and repeat the mix from scratch.

Sure enough, after making the final test, although I've got more photos to develop, I think I have found the right mixture, for the most part, to get a working 2 stage developer..
Ouzo
So minus the 'surge' marks, which is odd on the film, as it is definitely NOT Bromide Drag, I think the results here speak for themselves!

When I get some more photos I'll add a followup thread.

Until next time, keep those shutters firing!

Saturday, September 8, 2012

Dinner & A Movie


Sept. 02 - 2012

In celebration of our (Wife and I) 6th anniversary (September 03 - 2006), we decided to do the whole Dinner & A Movie thing.  Prior to dinner, as previously posted about, we went to the Starving Artist cafe.  Great food there, and really great service.
Well after we had a really nice waffle and a coffee, plus caught up with an old friend, we decided to eat.
The choice we made was the Lone Star Texas Grill restaurant, where we had never been before.
Dinner started out easy, and relaxed. Two glasses of Ice-Water and their bottomless Nachos & Salsa. The funny thing is, some restaurants just have Green Tea, or biscuits, or even fresh baked bread, but this one it's Nachos & Salsa as the "appetizer" that is on the house. The Nachos were, well, just that. Plain, unadorned Nachos, while the Salsa could have been the Tostios salsa you buy in the store. Either way, it puts you into a mood to have some Fajitas instead of a thick juicy steak. Needless to say, we did just that. Apparently they have a tortilla press located within plain view of the restaurant, and you can watch the tortillas as they are pressed flat, and baked under hot-lamps in a spirialing cascade down to the bottom where they are captured into a bowl to be placed in nifty little holders, which holds about 6 tortilla shells for your enjoyment with your Fajitas.
The Tortilla Over is supposed to be an attraction, as they have a large sign (right) depicting that there are Fresh Hot Tortillas baking right before your eyes.  The whole process from press to bowl takes about 5 minutes under the hot-lamps.  Really neat process actually, and the kids that were patronizing the restaurant thought it was a great attraction.  Almost every family with young children, and even some adults, made their way over to the Tortilla over to see it in action.
Needless to say, I didn't go there by choice, but after the coffee earlier and the glasses of water, I needed to make my way to the bathroom, which the hallway to was right beside where the oven is.  Err, separated by a good 10 feet of course, and a brick wall!  Don't need those nasty bathroom bacteriums making their way to the fresh bread.
This, of course, brings up to the main course, which we had a nice dish of calimari rings prior.  Sorry, the photo of the Calamari, just wasn't up to snuff.  But I can tell you, even if it was, it wouldn't have done those rings any justice.  They were very good!  Excellent flavour, and the dipping sauce was top notch!  If you, like myself and my wife, have a soft spot for Calimari, you would not be disappointed with Lone Star's Calimari.
 
Ah, the Main Course... We opted for the Dos Fajitas (Fajitas for Two) which was just fantastic.  You had the option of Chicken or Steak fajitas, but since we couldn't rightly decide what we wanted, we opted for choice #3.  A mix of both!  The fajitas are served on top of some roasted onions and green and red peppers, with Rice and Beans on the side.  Guacamole is, as expected, optional, since it's not liked by all, but I would recommend the Guacamole.  Also, to note, there is a dish you receive prior to the Fajitas being placed with the fixings still sizzling before you, hissing out their song of succulence, which contain the cheese, lettuce, tomatos, and of course, Sour Cream. 
All in all, the food was very well made!  The Tortillas, apparently, are bottomless, and your server (our's was called 'Moonshine') opens up the Tortilla bowl for you to serve the first ones.  Sure enough, Fresh baked Tortillas, and hot sizzling fixings, definitely at the top of my list of making for a most enjoyable meal.  Great place to eat, with excellent ambience, and very friendly staff.
We look forward to visiting this restaurant again!  Hopefully next time we'll decide on something different to eat, but with how good these Fajitas are, perhaps not.
 
Well, all that was left now, was the movie.  We popped over to the Five & Nine Drive-In, yes they still have Drive-In movies, where we spent the next hour and a bit waiting for the sun to set, and our bellies to settle from the succulent treats we had just moments before.  The light was perfect for a quick photo in the car before the sun set and we'd spend the next 6 hours (yes 6 hours!) in eye-candy bliss as our three feature movies would begin.  Normally for a feature packed evening you would see just 2 movies, which for what you pay, is still a great deal.  After all, what theatre can you go into which has your own private seating, personalized sound system, and great company for under $15.00?  I can't think of a single one.
Needless to say, we got the special triple-feature evening, being a Long-Weekend (Labour Day) where we watched The Expendables II, The Posession, and finally, The Bourne Legacy.
 
An enjoyable, if long, evening away from the kids.   Looking forward to giving it another go sometime!
 
If you're near a Lone-Star or if you have a local Drive-In, do yourself a favour.  Give it a whirl.  You never know, you might find something to make the stresses of the day, become a thing of the past.
 
Until Next Time, keep those shutters firing!
 
 
All photos taken are with a Nikkormat FT2 35mm SLR using Fuji Superia 800ASA Colour Negative film.  Film has been processed by hand in a Jobo C-41 Press-kit and scanned using an Epson Perfection 4490 Flatbed scanner.
 

Wednesday, September 5, 2012

The Starving Artist

I popped into a little cafe, that seems to specialize in, oddly as it is, Waffles.  Pretty much any kind of Waffle, it is just what they do. 
The Cafe is called, The Starving Artist.  It was an oddity to pop into as it is outside of an area that I spend a fair amount of time in.  The main attraction for me to go there was to visit a friend I have not seen in years.  I'm quite glad I did, as it was nice to catch up!
Needless to say, upon entering, and waiting to be seated, we (my wife and I) were served a bottle of water.  I know, this sounds very odd, but it is the fact that the bottle is corked, as seen to the left, and easily resealable to prevent various "friends" from taking a swim in.  Sure enough, we were served by our friend Leah, as well as a co-worker of hers.  I just ordered a coffee to enjoy, as I was more interested in relaxing and seeing the cafe and having a short visit with one of my oldest friends.
I believe it was just a basic Americano bean light roasted coffee, which had the right flavor for the moment.  Not too strong, and with just enough bitterness to tempt the palate..    Of course, we weren't just there for a visit and a small cup of coffee, we were there to try what this little cafe was famous for.  Their specialty waffles!  Well, a quick glance at the menu and we were able to quickly (but not easily) decide on a small dish.  A Blueberry (we substituted for strawberry) waffle with Vanilla ice-cream and whip-cream.  It was just splendid!

The ice-cream was a perfect softness, while the waffle was cooked to perfection.  The butterscotch topping was, as expected, sweet, and the strawberries were wonderfully ripe, sweet, and flavourful with just the right amount of tanginess to them.
The waffle edges were nicely crisped, while the middle was soft, and held a wonderful flavour to it.  It easily absorbed some of the melting ice-cream, which made the dish that much better!  Sure enough, I made sure I let Donna have the first bite.  Her expression may look like it's a bit bitter, but I can promise you that it was more along the lines of just being the right time to press the shutter for a facial expression showing that it was a big mistake to come there..
She quickly devoured the waffle, and I did manage to help her a bit.  Although we could have afforded a second waffle, we opted not to and quickly packed up to head on our way. 

But before I close this little segment of work let me just say that this is a wonderful little cafe.  It's one of the few waffle houses in the city, but is definitely one of the better cafes I have been to.  The ambiance and location is very nice, albeit more parking around wouldn't hurt (WAKE UP CITY OF TORONTO!).  The choice of meals is very good, with a strong emphasis on waffles, obviously.  The interesting thing is just how much they cater to the waffle loving crowd they get.  I mean.. Bacon Benny Waffles.. Bacon Waffles, and more..
It's basically a Bacon Waffle lover's dream come true.  A place that specializes in both Bacon, and of course, their wonderful waffles.

The decor in the place very much stands out, as it is definitely geared more toward the "artsy" crowds, but anyone will fit in, as it is a fun little cafe to visit.

Located on Landsdowne Avenue in Totonto, just North of Bloor Street West, it is a very easy place to get to.  Within steps from Landsdowne Subway station, and a short jog up from Bloor street.
The Starving Artist is close enough that anyone can easily make it a place to visit as often as they would like.  I will definitely be going back.  Hope to see you there!

The Starving Artist Cafe
584 Lansdowne Avenue Map.fde7d34
Toronto, ON M6H3Y6

(647) 342-5058

Food is quite good to excellent.  Staff is very friendly, and make you feel right at home.  The ambiance is very light and enjoyable, and it is a great place to just come in and enjoy a waffle with a coffee..  I'd give it a 3½/5 to 4/5.  The prices are at the point where you almost feel like you should be paying a bit more for, but you are definitely getting what you pay for.  


All photos were taken on a Nikon Nikkormat FT2 w/50mm ƒ/1.8 Nikon Lens on Fuji Extra 800ASA film, and developed in a Jobo C-41 Press Kit.

Tuesday, September 4, 2012

Saying Goodbye

Today I am officially saying goodbye to two of my beloved cameras.  My Praktica L2 and Praktica LLC. 

Rolleicord VThe L2 has served me faithfully in the passed 2 years since I acquired it, and has proven itself time and time again.  Giving me wonderful memories that will continue to be cherished until I no longer can remember them.  
The camera, although I got it for free, has been my favorite fully mechanical SLR.  The M42 mount let me experience a whole new line of lenses that I otherwise would never have known existed.  The introduction to this camera let me learn more about how a camera works than any other camera or any class could have possibly taught me.  Since it did not have a light meter, I had to figure out the lighting on my own, either using a Hand-Held meter, which I did not posess at the time I acquired the L2, or the Sunny ƒ/16 rule.  Well, now it is gone to its new home.  Although its new home is a temporary one, it will move on from there to someone that will use it more than I had been in the passed few months.  Unfortunately, after almost 2 years of service, it become delegated to my display shelf.  Not really by choice, per se, but by the fact that I just found myself reaching for my Exakta or Signet 35 more often.  In fact, my Exakta has become my 35mm SLR of choice over my wide-range of 35mm SLRs. 
Well, 2 weeks ago I packed my Praktica L2 and Praktica LLC into a box, along with 13 rolls of Polypan F 50ASA film, 2 FD Teleconverters, and some prints (not the most outstanding prints) but prints nontheless, and shipped them down to The Film Photography Project.
The Artist's HandAfter 2 years of faithful service, I decided that instead of them becoming shelf-queens, they should be sent out to other photographers to use.  Either a budding photographer, or something that is looking for something a little less electronic and more mechanical, it will be wonderful to see this camera become someone else's trusted companion.

That moves me on to the LLC.  This is a special camera for me as well.
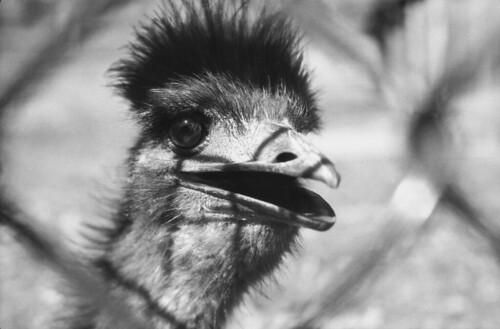
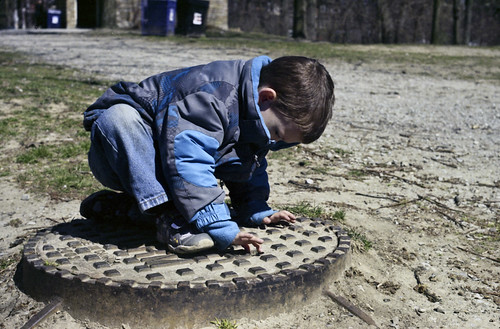
I had purchased it with the full intention of cleaning it, testing it, buying a "kit" lens for it, and shipping it out the door as a sale item only, with full intentions of it being a money making camera.  Instead, I ended up keeping the camera, the lens I ordered I love using (Pentacon 50mm 1:1.8), and couldn't bring myself to selling the camera.  It replaced my L2 as the camera of choice, just because it could be locked from accidental exposures, and it wouldn't continuously wind the film on and on and on.  The light meter didn't work on it, and yes I did test it fully with a brand new 4.5v battery, but the meter was dead.  Not really a problem, as I was used to using my L2, almost identical but without the meter, and I had acquired my late-grandfather's old Sears Tower Selenium Cell light meter.  Although I never used it in studio, like I had with my L2, I did use it at places like the Toronto Zoo, and High Park, plus I also wandered around the city with it.  Some of my most memorable images with this camera are a photo of a Emu at the High Park zoo, or a photo of my son playing on a manhole cover.
HighPark EmuSuch as the one to the left, where I was using, as ironic as it is, the Pentacon 50mm 1:1.8 that I had purchased to make the camera a "kit" camera, with a 50mm lens.  The lens, though, is just strikingly sharp, and gives such incredible clarity that I had to do a double take when I first saw this negative.  It is just perfect, and the lens gives very nice contrast, even shot in bright light.  The coatings are more modern than many of my other M42 lenses, and is very similar to a Carl Zeiss 50mm Pancolor lens.  Granted, CZ glass is probably a step up from this lens, but not too much of one.  Of course, using it for B&W, it's about contrast more than colour rendition! 
Speaking of Contrast and colour rendition, though, it does a great job with that as well!
Sure, the image is a little cool (I blame Fuji Superia for that) but it is fairly accurate without too much colour correction in post.  But the sharpness for this lens is phenomenal.

Checking The Grate
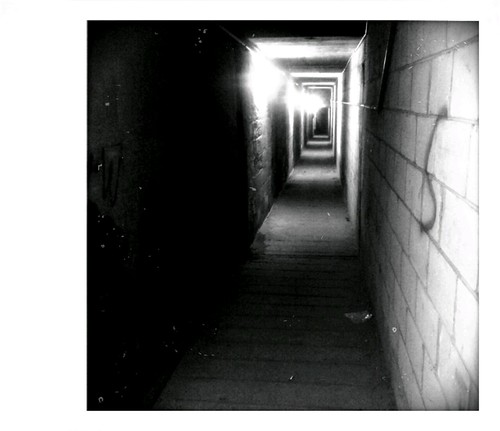
There is something about these little cameras that I really will miss.  Perhaps it is their charm, or the mirror slap that would make a Medium Format SLR, like the Pentax 67, proud. 
Maybe it is the full metal body that can leave more than a simple bruise on your foot if you accidentally dropped one of these cameras on it.   They are heavy, awkward, and some even say downright ugly to look at.  But there is something about them.. The charm of these old Communist Germany cameras that just leaves you a little more humbled about the Automatic cameras that came out of Japan.  These old clunker cameras aren't just good, they are a piece of photographic history that I am proud to have been a part of. 
Sure, they don't have Autofocus, or Program mode, even if their Japanese competitors had Shutter Priority modes, or even Aperture priority modes. 
The one thing they didn't lack, was character.  That is what really sets the Praktica cameras, at least in my eyes, apart from the rest.

So I say goodbye to a pair of cameras that brought me closer to film photography, and rejoice at the knowledge that they are going to be used in the way they deserve.  Not just to sit on a shelf and collect dust, with the possibility of being used once or twice a year.

To those that will receive either of these wonderful cameras, please remember, they are a part of history.  They are brilliantly designed, and simple to operate. 
They are one of a kind.......


Apple Blossoms
Apple Blossoms - Praktica LLC - Vivitar 135mm ƒ/2.8 - Fuji Reala
Forgotten Combination
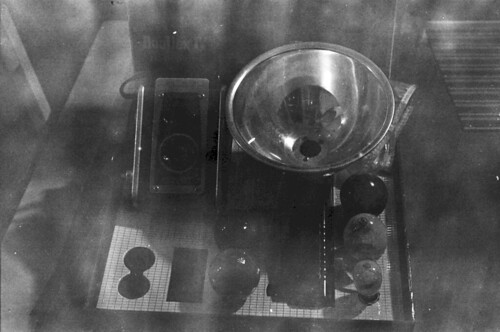
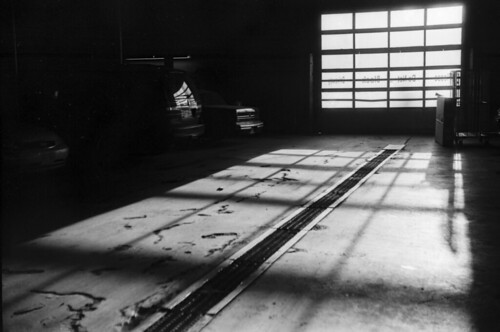
Forgotten Combination - Praktica LLC -
Pentacon 50mm ƒ/1.8 - Fuji Superia 200
Bicycle Post
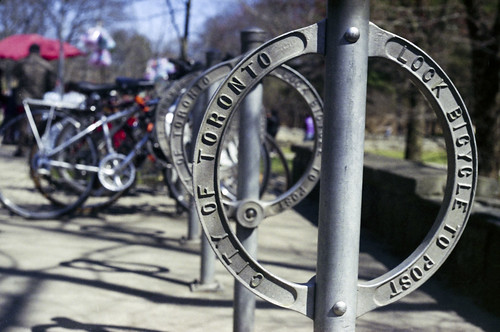
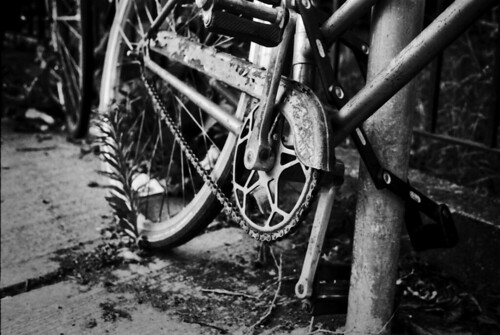
Bike Locks - Praktica LLC - Pentacon 50mm ƒ/1.8 - Fuji Superia 200

Tuesday, August 28, 2012

It's All In The Wrist

Sepia Plate
Calotype - Canon Powershot SX-120 P&S Digital Camera
Toned in CS5 w/Exposure 4
Although it is not exactly shot on film, this is part of a series of Film Portraits that I was doing on location with my Portable Studio setup.  I decided to try using a Canon Powershot SX120 Digital P&S Camera, although it is closer to a bridge camera, that has an on-camera flash which can be used to trigger a secondary flash, such as my Blazzeo 180W/s Strobe. 
The reason for the Sepia Toned Plate image is that she was wearing a very classical costume, and it just felt right.
A fantastic model who just struck pose after pose after pose without much in the way of guidance, except if she stepped too far right or left and I had to redirect back in front of the screen.

Just brilliant!  Looking forward to working with her again..
Expect to see the film-shots uploaded in the near future, as I get them developed and scanned.

Until next time, remember to visit out friends at the Film Photography Project and tell Michael Raso that Michael Bitaxi sent you there.

As always, Keep those Shutters firing!

Thursday, August 23, 2012

Haven't Forgotten

Haven't posted in a while, as I have been concentrating on my Year On Film project.  Although the Year On Film and my main blog page (Through My Eye) do go hand in hand, I have been posting more on the Year On Film page in the past few posts.

Well, at the beginning of August I was up in Port Colborne/Wainfleet, Ontario.  It's not too far from Niagara Falls, and has some very interesting sites to see.  One of the few sites was, as previously posted, on a Run-Down home.
Rundown Motel - Pentax Spotmatic (1964)
Yashica Yashinon 50mm ƒ/2 M42 Prime - Fuji Neopan SS 100

 Well, I also revisited a collapsing home that I had visited the year before (above);
Rundown Motel - Exakta VXIIa
Carl Zeiss Jena 50mm ƒ/2.8 - Kodak Portra 160NC
This home, err ruined home anyway, I photographed last year with my Spotmatic, and even had a print done of it.  This time, however, I had my Exakta, and some Portra160NC loaded.  I didn't waste any time, and clicked off about a dozen frames around this home.  The only difference is that last year I had a completely different type of light than I did this year.  As I visited it last year in the waning hours of the day, getting long shadows and a nice warm tone, although I shot it in B&W, this time I had full sun, clear and empty blue skies, and lots of heat!  I did have my 4x5 View camera, which would have been a great choice to use for a photo or two of this place, but I didn't reach it out.  We were on a tight time-table as is already, and so I had to make due, again, with a 35mm Camera.  One day I plan on getting this with my, much, larger camera.  Although, 35mm does make a very nice image, and will make an ever better print!

I may have been busy lately, but I have never forgotten about the blog.

Until next time, remember to support film... And keep those shutters firing!

Monday, July 30, 2012

The Beauty Of Light

The most beautiful thing about light, is how it works.  I mean, you take just the word, Photography, which is derived from the Greeks.  Phos, which means light, and Graphe which means drawing.  So technically speaking, it means "light drawing"...  That in itself leads credence to the beauty of capturing the light in just the right way.
This weekend there was the perfect moment of light and time.  My sister has a beautiful front window, in which she has placed a bunch of light hungry plants. 
Not having a 50mm lens handy, at least not in M42 mount, I had a photo that would just have to be attempted with my Polaroid 420.
After getting this odd camera I have gone through about 20 frames of film on it, and now I need more.  It's rather interesting, at least to myself, to know that I have gone from the Instant type of photography with Digital, to a slower process with 35mm, 120, and 4x5 films, to a whole new instant type of photography with Polaroid. 
From TIP (The Impossible Project) film to Fuji Peel-Apart films, I am really enjoying the whole process. 

Well, back to the subject at hand, the hour had reached the pivotal moment in time known as the "Golden Hour". 

Admiration
Admiration - Polaroid Automatic LAND 420 - Fuji FP100C Film
The window was filtering light so beautifully, with the plants showing some incredible colours. 
I wanted to get a photo where it would show both the beauty of such wonderful light, to the type of loving touch and care one can instill on the caring of greenery around the home.
Sure enough I had the right model, right light, right setting, and it looks like I even picked the right camera for the capture.  I think I got exactly what I was supposed to.   The moment was perfect, with just the right amount landing on the key areas of the subject at hand.
Framing with this camera is never easy at "close" range, as there is no parallax adjustment, so for the fact that I was able to capture this perfectly the first time really makes me feel happy that I might very well have figured out the minor idiosyncrasies of this camera.

Like what you see?  Want to try your hand at some Instant Photography?  Well, by all means, visit our good friends at the Film Photography Project, and pick up your own Polaroid camera.  If you have one, they also sell the FP100C, or FP3000B.

Until next time everyone, support film & keep those shutters firing!

Wednesday, July 25, 2012

4x5 Instant Film

Okay, so my title is a little mis-leading, as 4x5 instant film is basically defunct.  There is Fuji FP100C or FP3000B peel apart film, and it's roughly Quarter plate sized film.  Needless to say, I am not using that film at all here.  I'm actually using Impossible Project Colorshade Gold PX600 film for this photo.  Now, it's just a proof of concept photo, and nothing more.  I wanted to prove that, yes, you can easily take a frame of INSTANT film and load it into a 4x5 film holder, then expose it, put it back into the Polaroid so the rollers can do their thing and spread the developer across the film so you can get your direct positive print.

So this is what I did, from start to finish.


Recently I was wondering the possibility of this idea to try to get a sharper image out of my Impossible film, and so I started to do some research into this concept of using a frame of instant film in a 4x5 view camera.  Sure enough, this has been done before, unsurprisingly, but I didn't see anything fancy with the results, which started to lead me to wonder about trying a studio shot with strobes, and lighting, and b/gs etc..  So I popped into my darkroom, unloaded my Polaroid 600P, removed a single frame of film, making sure to replace that frame of film with an already exposed and developed frame, loaded up my 4x5 holder, placing a small piece of tape on the film to hold it in place, closed the holder, and reloaded the Polaroid.
Sure enough, I close the film door on my Polaroid and the exposed frame pops right out, lining up the camera to start exposing the next frame of unexposed film.

Not wanting to wait, err, well, after I got home from work that is, I got my 4x5 setup, my AC Strobe with shoot-through umbrella, my SunPAK 622 Pro Auto handlemount flash, and my Chinese flash triggers.
My model, who happens to also be my wife, got up in front of the camera, and struck a pose for it.  I dialed in the focus, using my Loupe of course, tested the flashes again, began the composition of the shot, set the F-Stop and shutter speeds, and prepared to take the photo.
Getting out my trusty dSLR I took a few test shots to check the lighting, and low-and-behold, the lighting was near on perfect.  Probably could have opened up the lens a single stop considering, but I think it was fine for what I was attempting.
My model then proceeded to get back into position, and I rechecked the focus, got the lens, again, setup for the shot, stopping it down to ƒ/11, my shutter set to 1/60s (although I could shoot it at 1/400s for all intensive purposes) and proceeded to load the film holder.
Lens shutter closed, re-test of the strobes, darkslide up, shutter cocked.... 'CLICK'...  And that's it..
Closing the darkslide, and back to the darkroom for unloading of the film..
After only a moment or two in the darkroom, and reloading the frame of film back into my Polaroid, closing the door, and having the Polaroid spit the image out, it was time to wait and see how the photo develops.

So, 10 minutes later, after waiting very impatiently for the photo to develop,  I sneaked a peek at the picture to see how it came out.  Well, other than a slight framing issue, which I can easily correct for next time, I now have a photo that was taken on a 4x5 Camera onto a frame of Impossible PX600 Colorshade GOLD.
Selfy-Polaroid

As I said, a slight framing issue..  I intended on the photo being above the belt-line with her looking like she was trying to take a selfy with the Polaroid Camera.

Proof-Of-Concept works, and I will be trying this again, only this time with a slightly more sophisticated alignment of the film in the holder so I can make sure that I get a more accurately framed photo.

Until next time, stop by our friends at the Film Photography Podcast and say hi, or buy a pack of Impossible film, or even a Polaroid Camera.

Keep those shutters firing!

Tuesday, July 24, 2012

Long Light... The Perfect Time Of Day

Sadly, I was working when I took this photo, but there is one time of day when the light is just perfect.  There is no better time to go out with a camera and start shooting.  Although that could be said about any time of day, the Golden Hour is ultimately the best.
The light is at the right angle to give everything a warm glow to it, whether in the winter, or summer.  It's just the perfect time! 

Even indoors with the light slipping through the windows in a garage, you can't help but be in awe of the majest of such a beautiful moment.  The best time to shoot is when the sun is at its warmest tone, and sadly, before you know it, the moment is gone, and the sun has set.
Long Light
LONG LIGHT - Kalimar A (Welmy II) - 45mm ƒ/3.5 Terionon Lens - Polypan F 50 - MELONAL STOCK 10:00

Friday, July 20, 2012

Polaroid Adventures

Polaroid P 600
Polaroid P600 - Exakta VXIIa - CZJ T* 50mm ƒ/2.8 -
ADOX CHS 20 @ ASA20 - Diafine 3+3 @24°C

Recently I picked up a Polaroid camera.  A Polaroid 600P, which is a folding (sort of) instant camera, which gives some very nice results.  It has two settings, which are 8' to INF. and 4-8 feet (close up).  The lens is a very basic single element Meniscus lens, but produces some nice results.  I believe it's a 1/60s shutter speed, supposedly it has a automatic shutter that is micro controlled, but I seriously doubt that.  The lens, I believe, is ƒ/11.  The flash is pretty decent, and works rather nicely, over all, in daylight works as a "FILL" while inside it is actually not as harsh as I was expecting.
This is my very first Polaroid camera, but not my last.  I put a bid, and won, a Polaroid Auto 420, which is a PACK FILM camera that FUJI still makes film for, which is a PEEL APART type of film.  This way you get a wonderful print, and a negative that you can actually use to create more prints later on.

The frame for the photos is actually "SQUARE" format, which is really simple to compose, as I'm used to shooting 6x6 frames.  I like the square format, because it has a whole different challenge to composition.
Posing For The 'Roid
Polaroid 600P - Impossible PX600 Silver-shade
There's only one problem with the 600P, and that is the availability of film.  There is ONLY Impossible Project film available for it, which is a really nice film, but is not similar to Polaroid or Fuji films, where you cannot watch the film develop.  The film is ejected from the camera still sensitive to light, which must be shielded from light immediately, or it'll wash out, and you can even lose the exposure.
Over time the image will also fade, and there are suggestions to take said photos and place them in a box with Silica Gel packs to help them dry, or get a IMPOSSIBLE DRY AGE kit to put on them to help keep the photo from fading.  I will definitely be getting this kit to try it out on the photos I truly intend to keep, not to mention I'll also put those photos in a binder.
The wonderful thing about this film is that it really is an "INSTANT" print film.  You get the print right there within 5 minutes, and can have an actual print, not just a negative or a digital film.  I found Polaroid film, ages ago, to be rather expensive, but after using this Impossible Film for the first time, I understand.  It gives you a print that you can hold, and don't have to send the film in for developing and printing.
It's still a bit pricier over-all, but it's a decent print, and looks good.
I have definitely caught the Polaroid Bug, thanks to our friends at the Film Photography Project.  Through their constant banter about Polaroid, and the fact that my friend John G. Meadows picked one up, and has been running amok with his Polaroid Pack Film camera, whether shooting for fun, or shooting his portraits with it, I just had to pick one up.  Sure enough, I have fallen in love with my Polaroid 600P and with a Polaroid AUTO 420 on its way, I think I'm going to enjoy this format even more...

Until next time, cheers!
From New Comes Old
Polaroid Land 95a - Taken on Polaroid Land 600P - Impossible PX600 Silver Shade Cool

Saturday, July 7, 2012

Back To My Roots

The first developer I ever used was TMAX Developer.  It's toted by some to be a very poor developer, for reasons that I do not know.
Well, I wanted to give it a try again almost 1 year later.  I learned how to develop my own film last year, September on the Labour Day weekend, by my friend John Meadows.
That same day I went to Henry's to purchase the bare necessities to develop film, such as Developer, Fixer, Cylinders, Thermometer, and some containers.  Well, the Containers ended up being purchased from Walmart instead, which were just 4L jugs of Distilled Water (tasted pretty damn good too!).  For $1.49, for a 4L resealable jug, and distilled water, which tastes great, I couldn't go wrong.  Considering the Datatainers are $6.99 for a 1L container, or $11.99 for a collapsible, it was a little more than I was going to spend for initial investment.
Well, that same night I developed my first films, Arista Premium 400 (Tri-X) and some Polypan F 50, and my choice of developer was TMAX Developer.  I didn't know any better, and honestly, I wasn't very good at using it at first.
Now, after a nearly year long hiatus from that Developer I decided to try it again.  First film to try it on, was Fomapan 100 film.  A film I had never used before, but wanted to get the chance to try something that no one else had yet done, at least, not published that I could find.

One of the dilutions for TMAX Developer is 1+4, which is to make a STOCK solution.
Personally, I do not do this, and mix it 1+9 instead from the Syrup to make a one-shot developer.  I am not worried about taking a longer time to develop, considering I have pushed 50ISO film to 800ISO with actually alright results.

Well, since I was in near uncharted territory, I had to figure out what would be the best time to develop the film, and so I decided to go ahead and try some test strips.  Unfortunately, this also ended up causing me to cut out a frame of film, not the end of the world though.
So I mixed up the solution of 28mL of TMAX Developer, and 222mL of water for a working solution of 1+9 @ 250mL 20°C.
I took my test strip and began to submerge it into the developer, 2cm at a time, and every minute dipped it further and further into the developer.
Once I was out of my film test strip, it had about 11 minutes worth of information on it, which showed that the best times were in between 8 minutes and 9 minutes.  10 and 11 minutes showed that I would be getting too much in the way of dense negatives, where as 6 and 7 minutes would end up with the negatives being a little too thin.  So after a little bit of deliberation, I decided on aiming for 8:15.
Sure enough, after the session was over, and the film was in its washing stage, I decided to have a peak at the negatives.  I was nothing short of impressed with what I saw.

But I think I'll let you be the judge of that......

Old Rusted Chainguard
Rusted Chainguard
Kodak Signet 35C Rangefinder - Kodak 44mm ƒ/3.5 Ektar Lens
Fomapan 100 @ EI 100 - Developed in Kodak TMAX Developer 1+9 8:15 @ 20°C

Wednesday, July 4, 2012

PHO Restaurant - Delicious Delights!

Not to make a plug for a restaurant that doesn't pay me to do so, but I must admit, this little restaurant in Vaughan, Ontario, is just wonderful.  The service is great, the food is hot, tasty, and arrives quickly to your table. 
And the atmosphere in the restaurant is very relaxed, and just such wonderful food.  I have tried different PHO soup across the city of Toronto, from Mississauga, to Scarborough, including some in Markham and Vaughan.  Even ones with rave reviews in the paper, which I found to be mediocre at best.
This one, on the other hand, located just North of Vaughan Mills Shopping Mall, off Rutherford Rd, is just amazingly good!

I got the #468 item on the Menu, which is grilled Pork and Chicken with Vermicelli noodles, topped with Peanuts.  I also got an order of #007 Banh Cuon, which is probably one of my favorite dishes!

The Pork is tender, soft, well cooked and seasoned, and just melts in your mouth.  The Chicken is very flavourful, has a nice smoked flavour to it from being grilled, the seasoning is very liberal, without being overpowering.  The noodles, well, they are Vermicelli noodles, or "Rice" noodles, which are always good!  The peanut topping really sets the dish off, as the nutty flavour truly compliments the entire meal.  A wonderful dish that I will definitely get again.

On the other hand, though, Donna got #402 on the menu.  Essentially something very similar to what I go, except it's Grilled Pork & a deep fried Spring Roll.  Having had this meal myself, before, I can honestly compliment on the food here.  Again, the pork is just wonderful.  Cooked to perfection and well marinated without being overpowering, with the perfect hint of smokey flavour from the grille.  The Spring Roll is flaky, flavourful, and hot!  Not Spicy, but hot.  The Vermicelli noodles are perfectly cooked, and just work so well with this meal that it's almost a shame when it's all finished.  Again, this is a dish I would definitely get again, as would Donna.  It is one of my favourite Vietnamese dishes, second only to the Banh Cuon.
Green tea is served upon entering, and seating, which is free of charge, flavourful, and a great choice when coming in from a cold winter day.  The tea here, in this instance, is actually chilled, to compliment the hot and hazy summer days we have been experiencing here. 
The Tea is always available, and if you should finish your pot of Tea, the server will quickly replace your empty pot with a full one.
Great service, and great staff!


One more item that really sets this restaurant, in my opinion, apart from many others, are these little bowls, plus the fact that there are bottles of Hoisen (Black Bean) sauce, and Red Hot Chili sauce on the table for your enjoyment.
Chop Sticks are a staple at most Vietnamese restaurants, but I have been to a couple where the chopsticks are the usual Plastic Ivory looking variety, but actually cheap wooden Take-Out type which I loathe.

Look forward to more reviews of different restaurants across the city, as I try out different places from time to time.  Any place that really catches my interest will definitely garner a review on my blog.  Hopefully the place will gain some more business this way.

Pho Mi 99 is a small family owned and operated Vietnamese Restaurant.  I am, in no way, affiliated with this restaurant, nor have I been paid to give this review on this restaurant. 


Pho Mi 99
3255 Rutherford Drive
Suite 5

Vaughan, ON L6A
(905) 532-0599


See you there!

C-41 Developing..

Late last year (September) I discovered developing my own B&W film, and got some great lessons from John G. Meadows, who in turn has his own blog called My Third Eye.  His blog is truly a lovely read, as he describes the photos that are most special to him, his method to creating the image, the model, and how he developed it.
His lessons for me was actually showing me how to develop film, which has now become something I just consider second nature to me.  Just a wonderful experience!  I started learning with commercial developers, but last month I finally developed some film in Caffenol.
What is Caffenol?  Why, it's Coffee developer!  Yes, Coffee!
My mixture is Washing Soda, Coffee Granules (Instant), Vitamin C and Table Salt.  It works brilliantly! Has softer grain than Rodinal, contrast like XTOL, and almost the same soft grain like D-76, but not quite.

Basket Case
Kodak SIGNET 35 - 44mm ƒ/3.5 Ektar - Kodak HD400
Unlocked
Kodak SIGNET 35 - 44mm ƒ/3.5 Ektar - Kodak HD400
Well, just last week I finally decided to mix up my C-41 JOBO Press Kit, and started to develop C-41 film for the first time.  It's super simple to do!  I'm actually rather upset I didn't do it sooner.  It's so simple to do that I really don't understand why I hesitated like I did..   Really upsetting indeed!

Well, now I have gone from not knowing how to develop film, to developing both B&W and C-41 film.

Saturday, June 30, 2012

620 Day

As the name states, it's 620 day!  What that is, really simple...  On June 20th, you take one of your wonderful 620 cameras out for a spin.
I did so with my Kodak Brownie Bullseye 6x9 620 Box camera with a Twindar Lens.

This is a fun camera to use, sports a very surprisingly sharp Twindar lens, a curved film-plane to help increase the sharpness in the corners, a simple design, multi-exposure protection, LONG exposure option, focuses from 4 feet to infinity, which is adjustable for a finer touch focus.

As for the day.. It was an uneventful day, as I spent most of it working.  But I did manage to get away for a little over an hour, which was the most wonderful time of the day. 
Besides that it got me out of work for an hour, it took my mind off the horrid nonsense of a horrible job, and place to work.
Allied PHOTO-PANThe day started out great.  I took the camera out of the Cabinet, opened my freezer and took out a roll of Allied Photo Pan 620 film.  This film expired in 1970, was stored in a cupboard at best, or... who knows where at worst!

Needless to say, I got the film loaded, and prepared the camera for a wonderful day of shooting, or at least an hour or so.

After my film was finished, it became the hardest part of the whole experience.  I had to figure out how to develop this film.  So, I asked in the ISF forum to try to figure out how to develop this film. 
The first reply was the most direct, and informative direction to how to even begin to develop the film.  This, it turns out, is a very easy thing to do.  I took a small section of the film, the tail end, clipped off a 2cm wide piece across the entire width of the film.  In daylight I dunked it into the developer from about 1cm at a time, and 1 minute at a time.  By the time it was done, it had gone across the entire film width, 1cm and 1 minute at a time and gave me an optimal developing time of 6 minutes for this film in my choice of developer, which happened to be HC-110 dilution B.

The results are nothing less than fantastic....  They may not be mind-blowing images, but the fact of the matter is, I didn't intend them to be, because I didn't have any clue how the film would behave, or how the images would come out.

Sure enough.... 

Incomplete Bench - 620 Day

Powerlines - 620 Day

Wednesday, June 13, 2012

Oakville Lighthouse

Oakville, a small sprawling city located just 30KM from the bustling city of Toronto.  A quick jaunt across the QEW will bring you to this little city full of history, and tradition, and culture.  It really is a beautiful and remarkable little city.
Although I haven't been there often, I did make sure to bring my big camera the last time I was there.

Taking a quick stroll down Navy Street, which is just west of Trafalgar Road and Lakeshore Blvd, you will get to the shores of Lake Ontario, and Oakville Harbour & Marina.  Guarding this point is a little Lighthouse that really stands out and makes a wonderful subject.

Needless to say, I just had to take a shot with my big camera.. And using a film like Fuji Provia 100F, I just couldn't go wrong...
Oakville Lighthousetd>
Calumet CC400 Monorail 4x5 Camera - Linholf-Schneider 210mm ƒ/5.6 Lens @ ƒ/32 - Compur Shutter - 15s - ND8 Filter + CPL


Thank you Toronto Image Works for the excellent work with the film.

Monday, June 11, 2012

Infrared Film - A First Look Into Another World

It's been a while since my last post, but I must say that I have become enthralled with Infrared film.  It opens up a whole new venue into shooting.. From greenery that turns to a bright white, to wood that stands out beyond what you'd normally see with a panchromatic film.
It's just an amazing look!

Buildings seem to come into a whole new life of their own, while the world goes dark and light around it.  Skies blacken, and the Earth brightens into a beautiful light beyond the normal spectrum.

Although I have only used it a few times, I just am amazed at the amount of detail that is pulled out of it.

Humble Humber
Zenza Bronica ETRs - 75mm ƒ/2.8 Zenzanon Lens - Ilford SFX200
Governor's Room - CNE Grounds
Zenza Bronica ETRs - 75mm ƒ/2.8 Zenzanon Lens - Ilford SFX200