So this is what I did, from start to finish.
Recently I was wondering the possibility of this idea to try to get a sharper image out of my Impossible film, and so I started to do some research into this concept of using a frame of instant film in a 4x5 view camera. Sure enough, this has been done before, unsurprisingly, but I didn't see anything fancy with the results, which started to lead me to wonder about trying a studio shot with strobes, and lighting, and b/gs etc.. So I popped into my darkroom, unloaded my Polaroid 600P, removed a single frame of film, making sure to replace that frame of film with an already exposed and developed frame, loaded up my 4x5 holder, placing a small piece of tape on the film to hold it in place, closed the holder, and reloaded the Polaroid.
Sure enough, I close the film door on my Polaroid and the exposed frame pops right out, lining up the camera to start exposing the next frame of unexposed film.
Not wanting to wait, err, well, after I got home from work that is, I got my 4x5 setup, my AC Strobe with shoot-through umbrella, my SunPAK 622 Pro Auto handlemount flash, and my Chinese flash triggers.
My model, who happens to also be my wife, got up in front of the camera, and struck a pose for it. I dialed in the focus, using my Loupe of course, tested the flashes again, began the composition of the shot, set the F-Stop and shutter speeds, and prepared to take the photo.
Getting out my trusty dSLR I took a few test shots to check the lighting, and low-and-behold, the lighting was near on perfect. Probably could have opened up the lens a single stop considering, but I think it was fine for what I was attempting.
My model then proceeded to get back into position, and I rechecked the focus, got the lens, again, setup for the shot, stopping it down to ƒ/11, my shutter set to 1/60s (although I could shoot it at 1/400s for all intensive purposes) and proceeded to load the film holder.
Lens shutter closed, re-test of the strobes, darkslide up, shutter cocked.... 'CLICK'... And that's it..
Closing the darkslide, and back to the darkroom for unloading of the film..
After only a moment or two in the darkroom, and reloading the frame of film back into my Polaroid, closing the door, and having the Polaroid spit the image out, it was time to wait and see how the photo develops.
So, 10 minutes later, after waiting very impatiently for the photo to develop, I sneaked a peek at the picture to see how it came out. Well, other than a slight framing issue, which I can easily correct for next time, I now have a photo that was taken on a 4x5 Camera onto a frame of Impossible PX600 Colorshade GOLD.
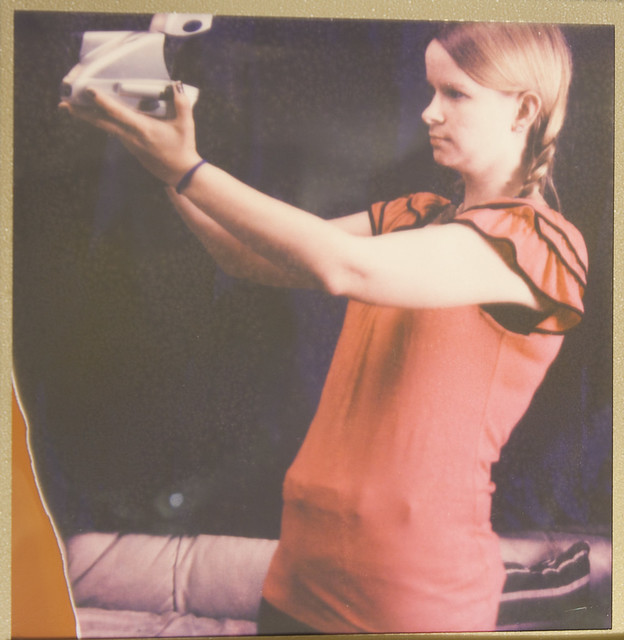
As I said, a slight framing issue.. I intended on the photo being above the belt-line with her looking like she was trying to take a selfy with the Polaroid Camera.
Proof-Of-Concept works, and I will be trying this again, only this time with a slightly more sophisticated alignment of the film in the holder so I can make sure that I get a more accurately framed photo.
Until next time, stop by our friends at the Film Photography Podcast and say hi, or buy a pack of Impossible film, or even a Polaroid Camera.
Keep those shutters firing!
No comments:
Post a Comment